Light-emitting diodes are used in applications as diverse as aviation lighting, automotive lighting, advertising, general lighting and traffic signals. LEDs have allowed new text, video displays, and sensors to be developed, while their high switching rates are also useful in advanced communications technology.
Download LED Interfacing with ATmega16 Project C Code
Download LED Blinking with ATmega16 Project C Code
Download LED Pattern 1 with ATmega16 Project C Code
Download LED Pattern 2 with ATmega16 Project C Code
Download LED Pattern 3 with ATmega16 Project C Code
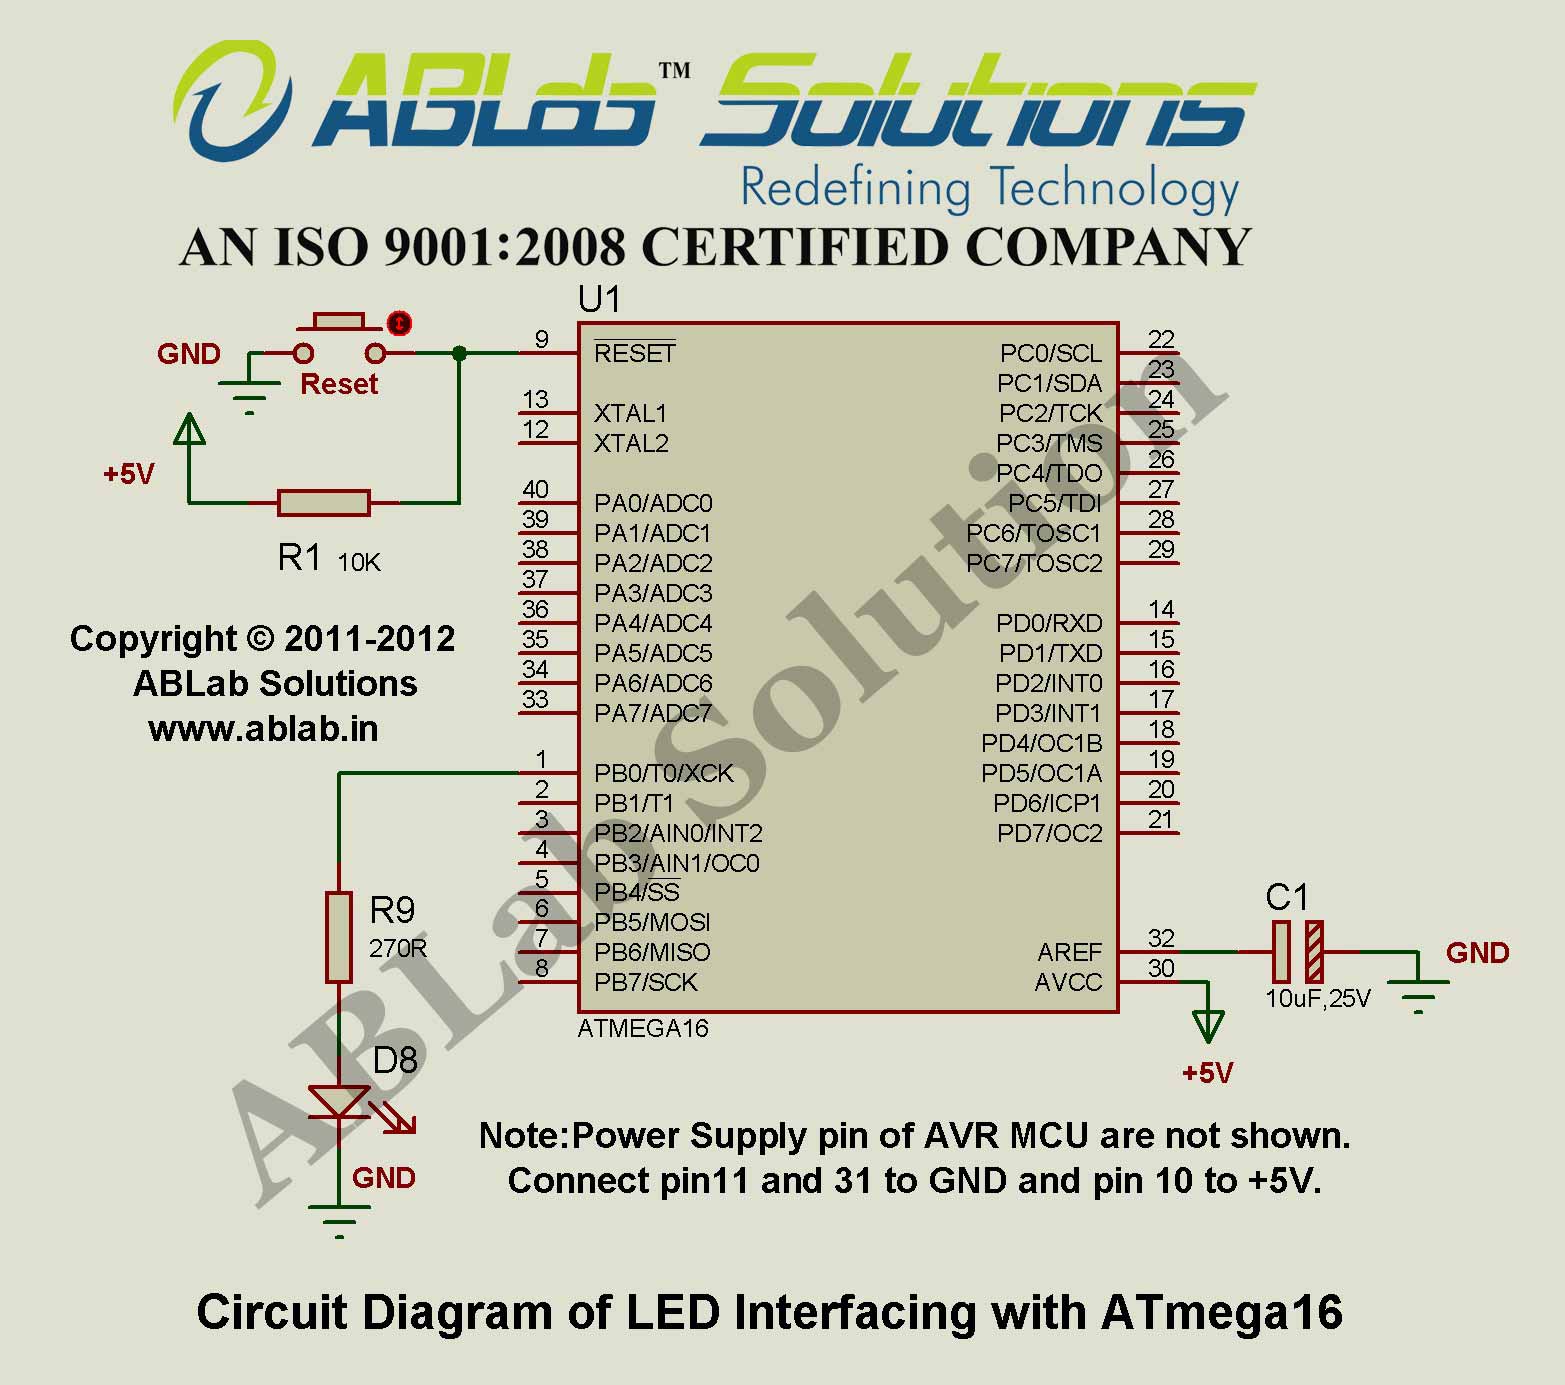
LED Interfacing with ATmega16
In this project, you will learn How to interface a LED with AVR ATmega16 microcontroller. You will connect a LED with AVR ATmega16 microcontroller and you will glow the LED by sending a high signal or high output from the microcontroller.

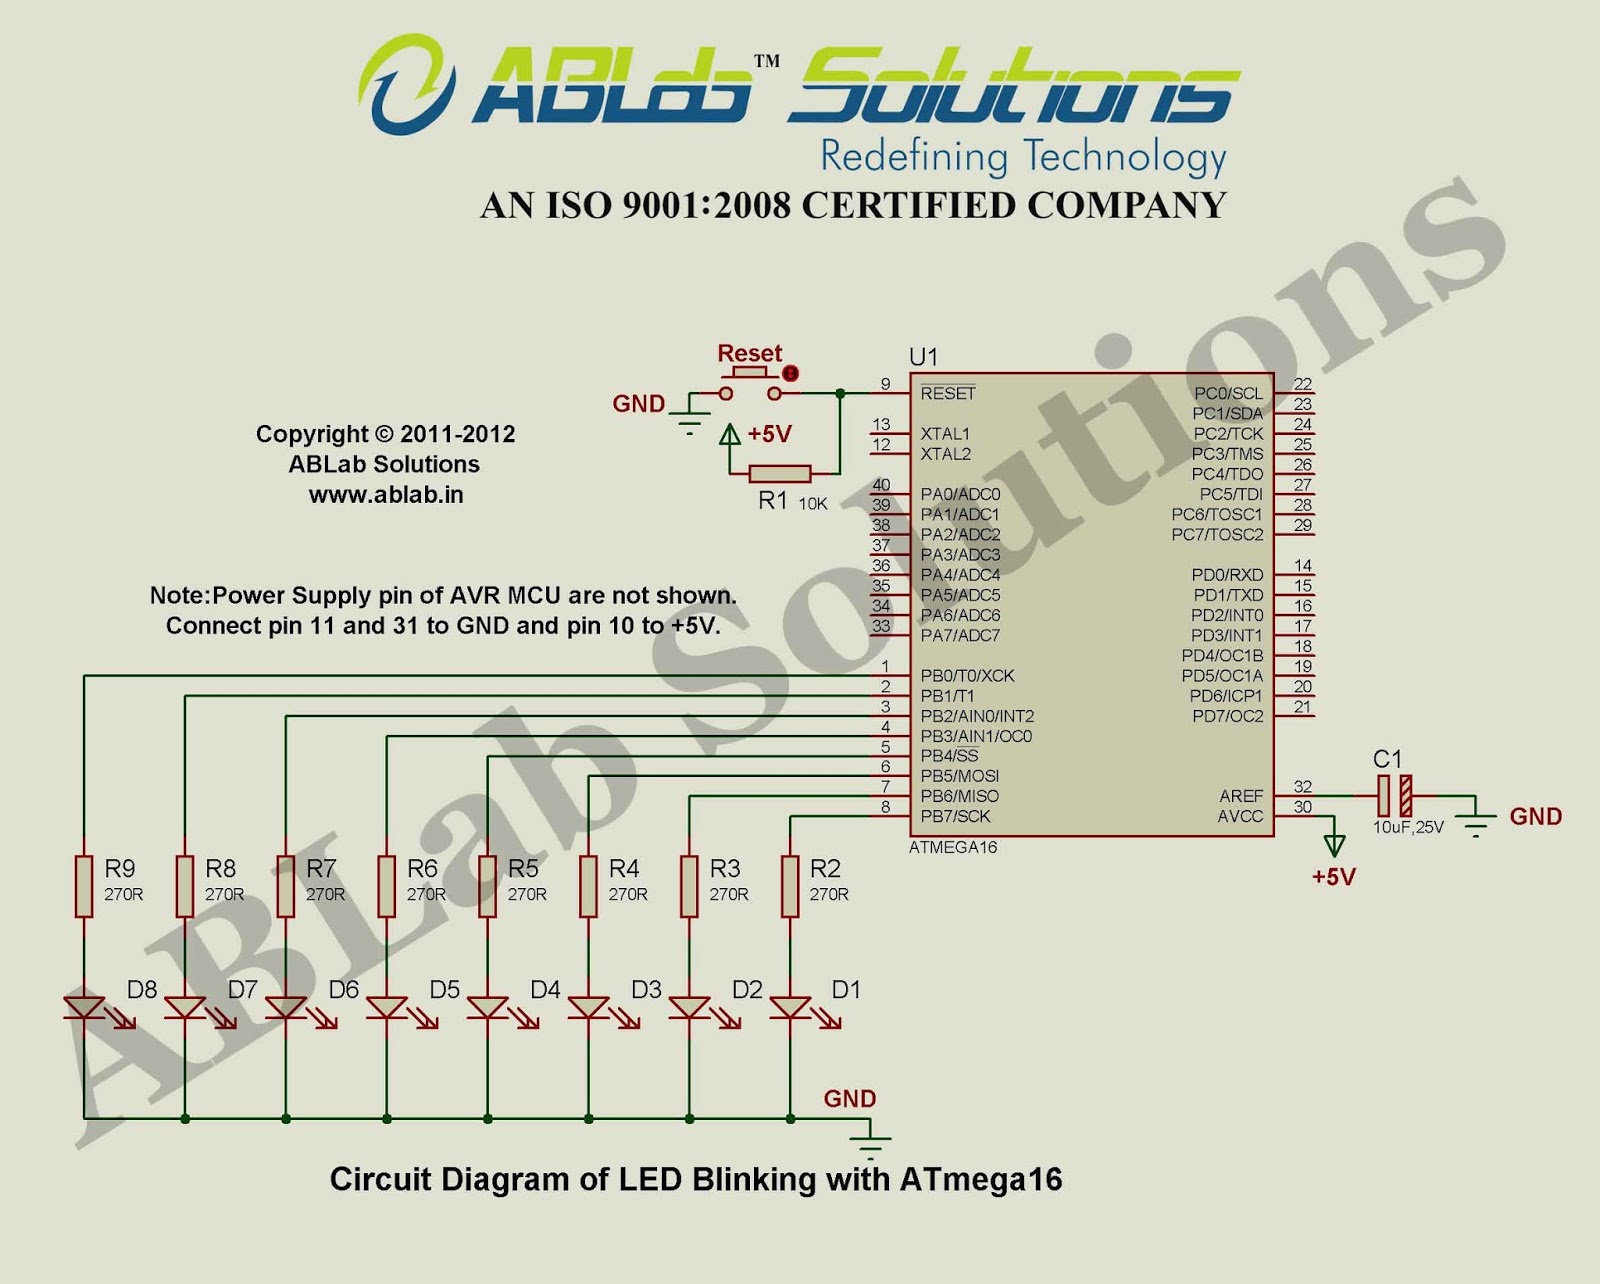
LED Blinking with ATmega16
Blinking LEDs in Embedded System is like the “Hello World” program of C programming language or any other programming language. In this project, you will learn How to blink LEDs with AVR ATmega16 microcontroller. First, you will connect the 8 LEDs with 8 pins of any port of the ATmega16 microcontroller. Then, you will make all the 8 LEDs to blink with an interval of 500ms. It means, initially you will glow all the 8 LEDs for 500ms and then, you will turn off all the 8 LEDs for 500ms. This process continues forever and in this way LEDs blinks continuously.

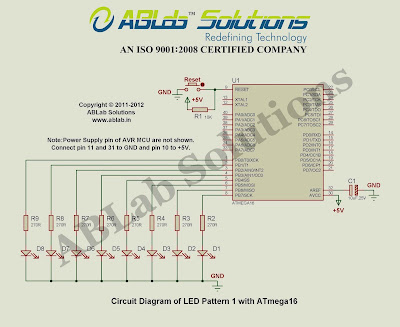
LED Pattern 1 with ATmega16
In this project, you will learn How to generate different patterns in a 1×8 LED array with AVR ATmega16 microcontroller. First, you will connect the 8 LEDs with 8 pins of any port of the ATmega16 microcontroller. Then, you will generate the below pattern in the 1×8 LED array. The pattern is shown in below diagram:
| 0 | 1 | 2 | 3 | 4 | 5 | 6 | 7 | LED Position |
| x | x | x | x | x | x | x | x | Initial State of LEDs |
| * | x | x | x | x | x | x | x | 2nd State of LEDs |
| x | * | x | x | x | x | x | x | 3rd State of LEDs |
| x | x | * | x | x | x | x | x | 4th State of LEDs |
| x | x | x | * | x | x | x | x | 5th State of LEDs |
| x | x | x | x | * | x | x | x | 6th State of LEDs |
| x | x | x | x | x | * | x | x | 7th State of LEDs |
| x | x | x | x | x | x | * | x | 8th State of LEDs |
| x | x | x | x | x | x | x | * | Final State of LEDs |
In the above diagram, * means LED is on and x means LED is off. The time interval between each state is 500ms and the above pattern continues forever.

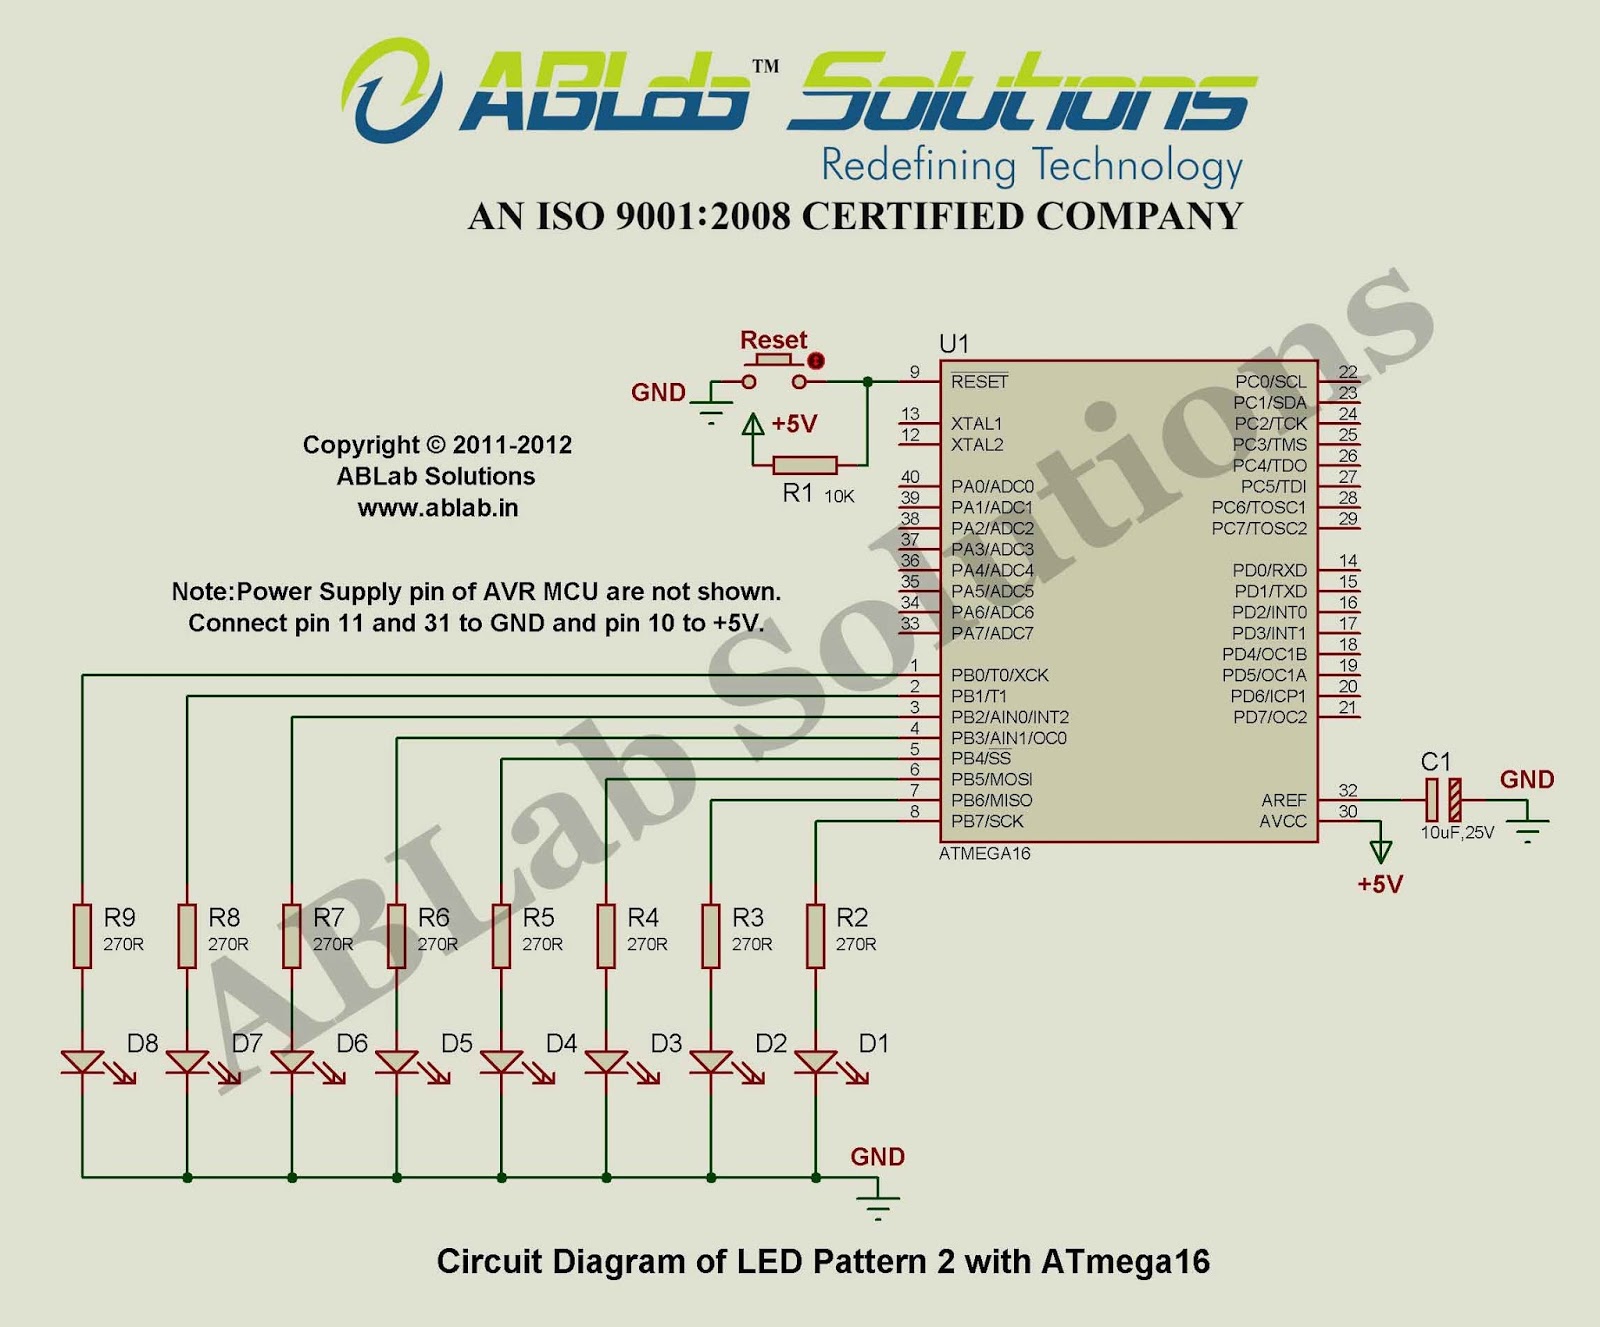
LED Pattern 2 with ATmega16
In this project, we will learn How to generate different patterns in a 1×8 LED array with AVR ATmega16 microcontroller. First, we will connect the 8 LEDs with 8 pins of any port of the ATmega16 microcontroller. Then, we will generate the below pattern in the 1×8 LED array. The pattern is shown in below diagram:
| 0 | 1 | 2 | 3 | 4 | 5 | 6 | 7 | LED Position |
| x | x | x | x | x | x | x | x | Initial State of LEDs |
| x | x | x | x | x | x | x | * | 2nd State of LEDs |
| x | x | x | x | x | x | * | x | 3rd State of LEDs |
| x | x | x | x | x | * | x | x | 4th State of LEDs |
| x | x | x | x | * | x | x | x | 5th State of LEDs |
| x | x | x | * | x | x | x | x | 6th State of LEDs |
| x | x | * | x | x | x | x | x | 7th State of LEDs |
| x | * | x | x | x | x | x | x | 8th State of LEDs |
| * | x | x | x | x | x | x | x | Final State of LEDs |
In the above diagram, * means LED is on and x means LED is off. The time interval between each state is 500ms and the above pattern continues forever.

LED Pattern 3 with ATmega16
In this project, we will learn How to generate different patterns in a 1×8 LED array with AVR ATmega16 microcontroller. First, we will connect the 8 LEDs with 8 pins of any port of the ATmega16 microcontroller. Then, we will generate the below pattern in the 1×8 LED array. The pattern is shown in below diagram:
| 0 | 1 | 2 | 3 | 4 | 5 | 6 | 7 | LED Position |
| x | x | x | x | x | x | x | x | Initial State of LEDs |
| * | x | x | x | x | x | x | x | 2nd State of LEDs |
| * | * | x | x | x | x | x | x | 3rd State of LEDs |
| * | * | * | x | x | x | x | x | 4th State of LEDs |
| * | * | * | * | x | x | x | x | 5th State of LEDs |
| * | * | * | * | * | x | x | x | 6th State of LEDs |
| * | * | * | * | * | * | x | x | 7th State of LEDs |
| * | * | * | * | * | * | * | x | 8th State of LEDs |
| * | * | * | * | * | * | * | * | Final State of LEDs |
In the above diagram, * means LED is on and x means LED is off. The time interval between each state is 500ms and the above pattern continues forever.


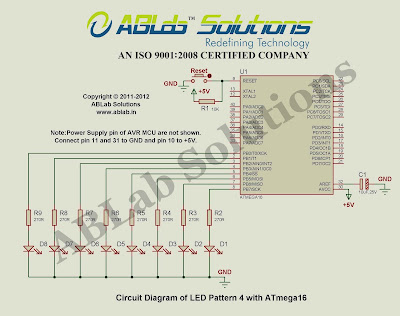
LED Pattern 4 with ATmega16
In this project, we will learn How to generate different patterns in a 1×8 LED array with AVR ATmega16 microcontroller. First, we will connect the 8 LEDs with 8 pins of any port of the ATmega16 microcontroller. Then, we will generate the below pattern in the 1×8 LED array. The pattern is shown in below diagram:
| 0 | 1 | 2 | 3 | 4 | 5 | 6 | 7 | LED Position |
| x | x | x | x | x | x | x | x | Initial State of LEDs |
| x | x | x | x | x | x | x | * | 2nd State of LEDs |
| x | x | x | x | x | x | * | * | 3rd State of LEDs |
| x | x | x | x | x | * | * | * | 4th State of LEDs |
| x | x | x | x | * | * | * | * | 5th State of LEDs |
| x | x | x | * | * | * | * | * | 6th State of LEDs |
| x | x | * | * | * | * | * | * | 7th State of LEDs |
| x | * | * | * | * | * | * | * | 8th State of LEDs |
| * | * | * | * | * | * | * | * | Final State of LEDs |
In the above diagram, * means LED is on and x means LED is off. The time interval between each state is 500ms and the above pattern continues forever.
Download LED Pattern 4 with ATmega16 Project C Code
LED Pattern 5 with ATmega16
In this project, we will learn How to generate different patterns in a 1×8 LED array with AVR ATmega16 microcontroller. First, we will connect the 8 LEDs with 8 pins of any port of the ATmega16 microcontroller. Then, we will generate the below pattern in the 1×8 LED array. The pattern is shown in below diagram:
| 0 | 1 | 2 | 3 | 4 | 5 | 6 | 7 | LED Position |
| x | x | x | x | x | x | x | x | Initial State of LEDs |
| x | x | x | * | * | x | x | x | 2nd State of LEDs |
| x | x | * | x | x | * | x | x | 3rd State of LEDs |
| x | * | x | x | x | x | * | x | 4th State of LEDs |
| * | x | x | x | x | x | x | * | Final State of LEDs |
In the above diagram, * means LED is on and x means LED is off. The time interval between each state is 500ms and the above pattern continues forever.

Download LED Pattern 5 with ATmega16 Project C Code

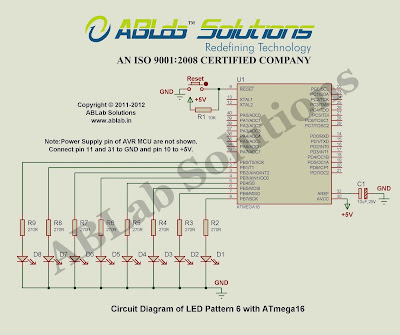
LED Pattern 6 with ATmega16
In this project, we will learn How to generate different patterns in a 1×8 LED array with AVR ATmega16 microcontroller. First, we will connect the 8 LEDs with 8 pins of any port of the ATmega16 microcontroller. Then, we will generate the below pattern in the 1×8 LED array. The pattern is shown in below diagram:
| 0 | 1 | 2 | 3 | 4 | 5 | 6 | 7 | LED Position |
| x | x | x | x | x | x | x | x | Initial State of LEDs |
| * | x | x | x | x | x | x | * | 2nd State of LEDs |
| x | * | x | x | x | x | * | x | 3rd State of LEDs |
| x | x | * | x | x | * | x | x | 4th State of LEDs |
| x | x | x | * | * | x | x | x | Final State of LEDs |
In the above diagram, * means LED is on and x means LED is off. The time interval between each state is 500ms and the above pattern continues forever.
Download LED Pattern 6 with ATmega16 Project C Code
LED Pattern 7 with ATmega16
In this project, we will learn How to generate different patterns in a 1×8 LED array with AVR ATmega16 microcontroller. First, we will connect the 8 LEDs with 8 pins of any port of the ATmega16 microcontroller. Then, we will generate the below pattern in the 1×8 LED array. The pattern is shown in below diagram:
| 0 | 1 | 2 | 3 | 4 | 5 | 6 | 7 | LED Position |
| x | x | x | x | x | x | x | x | Initial State of LEDs |
| x | x | x | * | * | x | x | x | 2nd State of LEDs |
| x | x | * | * | * | * | x | x | 3rd State of LEDs |
| x | * | * | * | * | * | * | x | 4th State of LEDs |
| * | * | * | * | * | * | * | * | Final State of LEDs |
In the above diagram, * means LED is on and x means LED is off. The time interval between each state is 500ms and the above pattern continues forever.

Download LED Pattern 7 with ATmega16 Project C Code

LED Pattern 8 with ATmega16
In this project, we will learn How to generate different patterns in a 1×8 LED array with AVR ATmega16 microcontroller. First, we will connect the 8 LEDs with 8 pins of any port of the ATmega16 microcontroller. Then, we will generate the below pattern in the 1×8 LED array. The pattern is shown in below diagram:
| 0 | 1 | 2 | 3 | 4 | 5 | 6 | 7 | LED Position |
| x | x | x | x | x | x | x | x | Initial State of LEDs |
| * | x | x | x | x | x | x | * | 2nd State of LEDs |
| * | * | x | x | x | x | * | * | 3rd State of LEDs |
| * | * | * | x | x | * | * | * | 4th State of LEDs |
| * | * | * | * | * | * | * | * | Final State of LEDs |
In the above diagram, * means LED is on and x means LED is off. The time interval between each state is 500ms and the above pattern continues forever.

Download LED Pattern 8 with ATmega16 Project C Code

LED Dancing with ATmega16
In this project, we will learn How to play with LEDs using AVR ATmega16 microcontroller. First, we will connect the 8 LEDs with 8 pins of any port of the ATmega16 microcontroller. Then, we will generate different patterns with the 8 LEDs. The LED Dancing project is a combination of LED Blinking, Pattern 1, Pattern 2, Pattern 3, Pattern 4, Pattern 5, Pattern 6, Pattern 7 and Pattern 8 projects.

Download LED Dancing with ATmega16 Project C Code
Comments
Post a Comment